Ethernet is a computer network technology that is used in the Local area network (LAN). You will also use Ethernet in different area networks like LAN, MAN, WAN. Ethernet is used to connecting multiple computers with single networks. You can connect up to 1024 computers and workstations with the help of Ethernet. The Ethernet is a wired connection of networks. In this post, we will discuss the Ethernet Settings in Windows 10.
To open Ethernet settings in windows 10, you will have to follow these given steps:
- Click on the “Windows” icon from the keyboard. You will also choose the windows icon from the Home display with the help of the mouse.
- Then from the popup menu click on Settings Gear icon, the windows settings will open.
- In settings choose Network & Internet Settings.
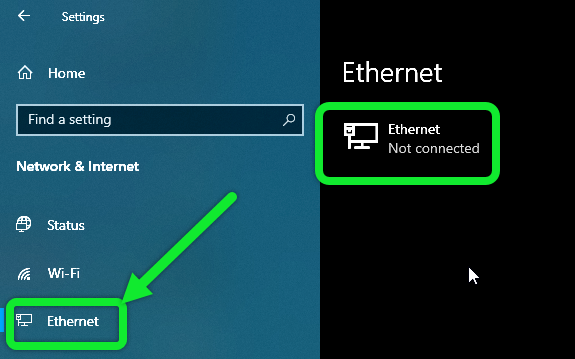
- Then from the Right, select the Ethernet Then you reached the Ethernet settings in windows 10.
In this post we will discuss about the given options:
- Ethernet connections
- Metered connection
- IP settings
- Properties
Let’s discuss one by one option given in the Ethernet setting.
After opening the Ethernet settings on your computer it will look like the given picture.

-
Ethernet connections
The first option is about the Ethernet connections. After connecting your computer with an Ethernet connection, you can view your connections from here. You will be able to manage your Ethernet connections from here.
-
Metered Connections
After clicking for mange your Ethernet connections you will be directed to a page, where you can see the metered connections option. If you have limited data plans, and want to control the over data usage then you make that connection as a metered connection. You can either ON or OFF this feature as per your requirement. If you want to set the data limit then from the given option you can also set a data limit for your connections. We will further discuss this feature. If you set a data limit then your windows help you to save your unnecessary usage of your data.

-
IP Settings
The next option is about the IP settings of your network connection. IP stands for “Internet Protocol”, which provides a unique number to get linked to a network provider and do online activities. From here you can see your IP assignment. You will be able to edit the IP assignment from here, and change as per your choice. You will choose either DHCP (which is automatic) options for your network connections. You will also choose the manual option for the IP assignment. After selecting the manual option you can manually set your IP assignment as per your requirement.

-
Properties
The next option is about the properties of connections. From here you can view your Ethernet connections properties. You will see all the properties from here like manufacturer, descriptions, drive versions, physical address, etc. You will be able to copy these given properties by clicking on the “copy” option from below.

Thanks for giving your valuable time for reading this post. I hope now you understand Ethernet Settings In Windows 10. If you want to share your ideas or suggestions or any doubts leave your comment box below.