Display plays an important role in every technical device. In this modern era, the computer used the most. Today in this article, we will discuss about multiple options available in display settings in windows 10. After reading this article you will be able to manage your windows 10 display settings, screen brightness, night light settings, change display orientation, change resolution settings & more display settings. Let’s Start:
For view Display Settings in Windows 10, follow these given steps:
- Click on the “Windows” icon from the keyboard. You can also choose the windows icon from the Home display with the help of the mouse.
- Then from the Right-click on setting option, here the windows setting is open.
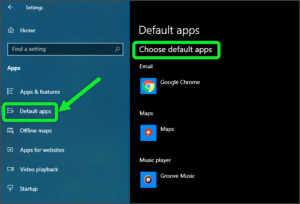
- In settings choose System settings.
- Then from the left choose Display options. then you reach to the Display settings in Windows 10.
In the display settings you will see these heading :
- Brightness and color
- Night light
- Night light settings
- Scale and layout
- Advanced scaling settings
- Display resolution settings
- Display orientation
- Multiple displays
- Advanced display settings
- Graphics settings
After opening the Display settings look like below image :

Let discuss about all the options one by one.
-
Screen Brightness
By this option, you can control the brightness level of your computer screen. This option is very useful in customizing the brightness level easily with the help of the cursor. We can easily adjust the brightness from here.

-
Night Light
The next settings in the display are “Night Light”. By use of these sets you can ON or OFF your night light. The Night light is very useful at night. It helps a lot to prevent our eyes from the strain from the screen brightness.

-
Night Light Settings
The Night light settings option is used for a night light settings. This settings is related to the Night Light. With the help of these sets, you can adjust the color temperature for the night light. This settings is very important in adjusting the color temperatures.

The next option in Night light settings is SCHEDULE.
After ON this feature you can schedule night light for your computer screen. You can set the time for turn ON the light i.e. from the starting time to the Ending point for Turn ON or OFF the night light.

NOTE: You can also schedule the night light at sunset by Turn ON the Location services on your computer.
-
Scale and Layout

By using these display settings you can change the size of text, apps, and other items. By default, 100{3e34dbe90adf94a365d68b625c6b1f8d30a7554df797939fcd48b203f0d1598b} size is selected automatically. But you can manually change the size of the text, apps and other items by selecting other options.
-
Advanced Scaling Settings

The Advanced scaling settings option is also very important in change the size of text, apps, etc. We can manually set the size by the use of this option. We can manually type the size of the apps and text and change it. It means all your displays will be set to the custom scaling size you enter.
-
Display Resolution Settings
The next option in the Display settings is “Resolution”.

By the use of this option, you can set the Resolution. By default, it is automatically set to the resolution that is perfect for your device. But you can easily change the Resolution by choosing from the options.
-
Display Orientation Settings
The next option in the display settings is the Orientation. By the use of the Orientation option, you can choose the orientation of your computer screen as Landscape or Portrait. You can set the orientation that you like the most.

By default in your computer the Landscape mode select, because our computer screen is always in the landscape.
NOTE: Landscape means less height and more width & Portrait means less width but more height (e.g. Mobile phones)
-
Multiple Display
In this model world, technology developed a lot. Multiple displays are also a modern technique. With the use of this feature, we can connect our display in Multi-order.
If you have a creative mind and you want to Multi – Setup for the display, then this settings helps you a lot. Today many people use this feature a lot. Many Gamers, Programmers, Directors, Designers use this feature.
-
Advanced Display Settings
The Advance Display option comes in under the Multiple Display settings. This helps a lot in display adapter properties, by use of this feature you can use a custom a color profile to improve color accuracy.

-
Display Graphics Settings
The last setting in the display settings is Graphic settings.

By the use of these settings, you can customize graphics performance preference for a specific application. Preference provides a good app preference. You can either select the Classic app or Universal app from the set preference.

I hope this article was useful to you. Please leave a comment to let us know if it worked for you.
Thanks for reading till the end.